Sunday, December 6, 2009

Girl Scouts Caramel Delight Bars


When I was in middle school/high school, I ate many many things that were not good for me at all (like spoonfuls of condensed milk straight from the can yumm). One thing I overindulged in with delight was Caramel Delights (or Samoas). My best friend Kelsey used to sell them every year, and when that time came around, I always ordered multiple boxes. I only ever bought Caramel Delights and Thins Mints. This was all before I realized that they were loaded with trans fat and all bunch of stuff. But omg were they delicious. I used to finish a box over the course of a day, and I never shared unless I had multiple boxes. Yes, I was a very greedy girl, but some things are just not meant to be shared=)
I haven't ordered any boxes in a while, and I really missed them. So, I decided to make my own. I got the recipe from Baking Bites, and it's pretty easy, there's just a lot of waiting involved. The cookies are in bar form because I was too lazy to roll and cut everything out! Still delicious though, but I think they taste better the next day=)

So the first thing you have to do is make your shortbread base, mold it into a 10x13 pan, bake it and then let it cool.

Toast the coconut in the oven, stirring occasionally, until it gets very light brown

Unwrap a gajillion caramels (or make your own)
Heat it up in the microwave with a little bit of milk till it gets like this.

Mix the caramel with the coconut
Spread mixture evenly across the cooled shortbread.
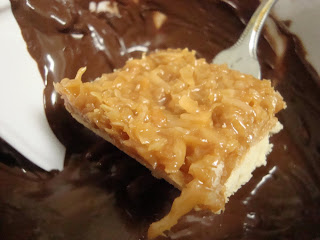
Allow to cool, slice into 30 bars and dip in melted chocolate,

Place them on parchment paper to cool

Drizzle them with chocolate and then hide them from your roommates and eat them all for yourself :D Or share them with others...I guess >.>

Homemade Samoas Bars
(from Baking Bites)

Cookie Base:

1/2 cup sugar
3/4 cup butter, softened
1 large egg
1/2 tsp vanilla extract
2 cups all purpose flour
1/4 tsp salt

*The shortbread is pretty thick, so I would recommend omitting some of the dough from the pan so that you get a thinner cookie.

First, make the crust.
Preheat oven to 350F. Lightly grease a 9×13-inch baking pan, or line with parchment paper.
In a large bowl, cream together sugar and butter, until fluffy. Beat in egg and vanilla extract. Working at a low speed, gradually beat in flour and salt until mixture is crumbly, like wet sand. The dough does not need to come together. Pour crumbly dough into prepapred pan and press into an even layer.
Bake for 20-25 minutes, until base is set and edges are lightly browned. Cool completely on a wire rack before topping.

Topping
3 cups shredded coconut (sweetened or unsweetened)
12-oz good-quality chewy caramels
1/4 tsp salt
3 tbsp milk
10 oz. dark or semisweet chocolate (chocolate chips are ok)

Preheat oven to 300. Spread coconut evenly on a parchment-lined baking sheet (preferably one with sides) and toast 20 minutes, stirring every 5 minutes, until coconut is golden. Cool on baking sheet, stirring occasionally. Set aside.

Unwrap the caramels and place in a large microwave-safe bowl with milk and salt. Cook on high for 3-4 minutes, stopping to stir a few times to help the caramel melt. When smooth, fold in toasted coconut with a spatula.
Put dollops of the topping all over the shortbread base. Using the spatula, spread topping into an even layer. Let topping set until cooled.
When cooled, cut into 30 bars with a large knife or a pizza cutter (it’s easy to get it through the topping).
Once bars are cut, melt chocolate in a small bowl. Heat on high in the microwave in 45 second intervals, stirring thoroughly to prevent scorching. Dip the base of each bar into the chocolate and place on a clean piece of parchment or wax paper. Transfer all remaining chocolate (or melt a bit of additional chocolate, if necessary) into a piping bag or a ziploc bag with the corner snipped off and drizzle bars with chocolate to finish.
Let chocolate set completely before storing in an airtight container.

Makes 30 bar cookies.

Thursday, December 3, 2009

Cheap Korean Food!

During my freshman year of college, I discovered that I had a love for kimchi. Back at home, I only ate it on the rare occasion when my grandma made it (she doesn't make me food anymore because she doesn't love me!). So although I liked kimchi, I didn't eat it all too much.
Then I came to New York and found that there were many days where I ate only eggs! So to liven things up, I went to M2M (an asian convenience store) and bought myself a 5 lb bucket of kimchi! If you ask my roommates, they will tell you that my meals consisted largely of eggs, kimchi and sriracha that semester. I went through 2 buckets in less than two months, and then I got a little sick! Kimchi overload!
Besides kimchi though, I love all kinds of korean food - kimbap, bibimbap, tteokbokki! I'll eat it all=) My favorite place to eat cheap korean food is Woorijip. Its a buffet style place that also has prepacked meals that are around $5-$6 a box. I went the other day with Derrick and Lilly after seeing Anthony Bourdain & David Chang at B&N. It was sooo good. Bourdain makes me giggle like a little school girl=)

Lilly go the Kimbap which was around $6 I think. It was a really large portion and she could hardly finished it (I, being the good friend, assisted her). There is better kimbap across the street though, at E-mo Bap!

Derrick got chicken in spicy chili sauce ($5.50), I forgot the exact name. This one was my favorite! It was pretty spicy and consisted of chunks of chicken, onions and bell pepper, It also came with rice. If you like sweet and sour pork, this is very similar although much spicier! He also got the japchae(korean glass noodles) which was delicious but oh so oily.

I got the shrump curry which also came with a korroke (potato croquette), $5.50. This one was kinda meh to me, I prefer vietnamese curry. The flavor of this curry was pretty light and not spicy at all. I think the chicken curry is better. The korroke though was very delicious.

After this meal, we couldn't move for quite a while and ended up sitting there for another 15 minutes digesting. The food is pretty greasy and great after a night of drinking.

Woorijip
12 W 32nd St
(between 5th Ave & Broadway)
New York, NY 10001
(212) 244-1115

Wednesday, November 18, 2009

Red Velvet Cupcakes (And the Apt Where Everything Breaks)

Having an apartment that overlooks Union Square and the Greenmarket is awesome. But living in it is not so great. So many things have broken since we got here in September. The fridge leaks, the bathroom doesn't drain, the soap dish broke off, the cupboard broke off, two gas burners don't light, and our AC only emits heat. The list goes on and on and new things break everyday! Case in point, when Lilly was making her red velvet cupcakes, our oven door handle broke off! *tear*
Despite this, the cupcakes turned out great! Lilly loves red velvet cupcakes. She is always in search of the perfect recipe. This time, she decided to use Cake Man Raven's famous recipe (remember Booby Flay's Red Velvet Throwdown?). It was moist, soft and flavorful. It's topped with a traditional cream cheese frosting.

Tip! When you're making cream cheese frosting, don't use cheap $1 cream cheese like we did! Your frosting will not turn out great. Stick to Philadelphia - the taste makes up for the price.

Red Velvet Cupcakes (Adapted from Cake Man Raven's Recipe for Red Velvet Cake)
Ingredients

* Vegetable oil for the pans
* 2 1/2 cups all-purpose flour
* 1 1/2 cups sugar
* 1 teaspoon baking soda
* 1 teaspoon fine salt
* 1 teaspoon cocoa powder
* 1 1/2 cups vegetable oil
* 1 cup buttermilk, at room temperature
* 2 large eggs, at room temperature
* 2 tablespoons red food coloring (1 ounce)
* 1 teaspoon white distilled vinegar
* 1 teaspoon vanilla extract
* Cream Cheese Frosting, recipe follows

Directions
Preheat the oven to 350 degrees F. Line 2 12 cup cupcake tins with paper liners.

In a large bowl, sift together the flour, sugar, baking soda, salt, and cocoa powder. In another large bowl, whisk together the oil, buttermilk, eggs, food coloring, vinegar, and vanilla.
Using a standing mixer, mix the dry ingredients into the wet ingredients until just combined and a smooth batter is formed.
Fill 2/3 of the each cupcake liner with batter. Bake for 20-22 minutes or until an inserted toothpick comes out clean, rotating halfway through
Let cool in the pan for 5-10 minutes and then remove to cool completely.

Cream Cheese Frosting:
1 pound cream cheese, softened
4 cups sifted confectioners' sugar
2 sticks unsalted butter (1 cup), softened
1 teaspoon vanilla extract

In a large mixing bowl, beat the cream cheese, butter and vanilla together until smooth. Add the sugar and on low speed, beat until incorporated. Increase the speed to high and mix until very light and fluffy.


BTW Cake Woman Lilly demands that you make these cupcakes!

Sunday, November 1, 2009

How to Roast Peppers (Like a Badass)

I reallly love having a gas stove! Back at home, we have an electric one, so whenever a recipe calls for roasting something, I have to do it in my crappy oven - which never gets it right! So, when I'm in new york, I loveee roasting vegetables. It's fun because we do it like we're standing over a campire. I used wooden chopsticks to roast them, but skewers work too! Or tongs (but that's a luxury I can't afford) Don't try doing it with forks though, unless you want to throw them out after you're done!

1. First, start off with some beautiful sweet peppers. I got a whole box of these for $2 from the vegetable man on the corner of 14th and University=)

2.Impale a pepper on your roasting utensil of choice (Chopstick, skewer, tong)

3. Roast it into oblivion! Or until the skin turns completely black - about 5 minutes.

4. Hot box them in a plastic bag to let the skin steam a bit!

5. Peel off the blackened skin, rinse off the excess particles under the sink.

6. And you're done! You can toss them into salads or make a soup! Whatever you want=)

And now you're officially a badass!

Monday, October 26, 2009

Study Break at Otafuku


Being cooped up in a depressing apartment all day studying began to have an effect on me and Lilly, so we decided to take a break and go look for something delicious to eat. Having heard about takoyaki from a friend, Lilly suggested we go to a little hole in the wall in the East Village called Otafuku. I've never had takoyaki before, I only knew that they were some form of Japanese octopus ball, so I didn't know what to expect. But oh my goodness was it delicious! I now know that it's like a fried round pancake made with batter, diced or whole octopus, tempura scraps, pickled ginger, and green onion. It's topped with a okonomiyaki sauce, mayo and katsuobushi(fish shavings). Does it sound odd? Yes, maybe a little, but when you bite into it, you're mind will change. It's short of gooey from the batter and salty and a little sweet from the okonomiyaki sauce.
I'm not too sure how to describe it, but if you're ever near St. Marks and in need of a snack (I imagine this would be delicious at 3 a.m. after a long night of drinking) visit Otafuku!
Note - there's not much of an ambiance though. It's a hole in the wall with a little bench inside and minimal decor. Their other stuff looks great too, I'll have to do some more sampling next time!

Otafuku
236 E. 9th Street, New York NY 10003 (nr. 2nd Avenue)


Tuesday, October 20, 2009

Pumpkin Chocolate Chunk Bars


I live in a dorm, and sometimes they host events that promise free food! Most of the time, the offerings are quite dismal, but there are a few that totally exceed expectations. The one I went to a couple of days ago was one of the most underwhelming. I was lured by the promise of good coffee and delicious baked goods. What I got was mediocre coffee and a boxful of Entenmann’s Donuts. I guess I shouldn’t complain though, since it was all free. But I was still disappointed. Me and Lilly were craving something sweet and delicious and this did not satisfy us at all. Lesson of the day: don’t have high expectations or you will surely be disappointed!
When we got back to our apartment, we were quite depressed. So, I decided to make these delicious Pumpkin Chocolate Chunk Bars. And believe me, these were delicious. We ate them so fast that the whole trayful was gone by the next day. There were a total of 36 bars….I only have 3 other roommates!!!
So yea, they really hit the spot. And they made the apartment smell like fall! I got the recipe from Cook Woman Food but adjusted it to what I had. The bars were a bit cakey, which I have no complaints about. But if you want something a bit more chewy, I would either omit or lessen the amount of baking powder and soda in the recipe.
I used chocolate chunks, but you can use chips. The chunks just make it seem more chocolatey. I added vanilla extract because vanilla just belongs in baked goods. I also lessened the amount of sugar from 1.5 cups to 1 cup and added 3 eggs instead of 4 (because I only had 3 eggs in my fridge). In addition, to lighten it up, I substituted ½ a cup of oil with ½ a cup of applesauce (trust me, it works!).

Below is my version of the bars, but if you would like the original visit CookWomanFood.

Gather all your ingredients and preheat that oven to 350*!


Sift the dry ingredients together in a large bowl


It's like snow!


In a seperate bowl, combine your wet ingredients.


Mix Well!


Add the dry to the wet and stir until just combined


Add in the chocolate!! Yumm, you can be assured that a handful missed the bowl and landed in my mouth. Whoops!


Pour into a greased 10x15 baking pan and bake for 35-40 minutes at 350*F


Cut them into bars or whatever shape you like!


And eat them like they're gonna disappear right before you're eyes,because trust me, when people smell them, they will disappear very very quickly!

Pumpkin Chocolate Chunk Bars
(makes about 36 bars in a 15x10 pan)

2 cups flour
2 tsp. baking powder
2 tsp. cinnamon or pumpkin pie spice
1 tsp. baking soda
1 tsp. salt
3 eggs
1 16 oz Can of Pumpkin
1 cup sugar
1/2 cup oil
1 tsp vanilla extract
½ cup applesauce
2 cups semi sweet chocolate chunks
1. Combine the 1st 5 ingredients. Set aside.
2. Mix together eggs, pumpkin, sugar, and oil. Beat well. Add in the dry ingredients, stir just till combined, but don’t overmix!
3. Stir in chocolate chips.
4. Spread in a greased 15 x 10 pan. Bake in a 350* oven for abbut 35-40 minutes.

These bars are great unadorned. But you know what? I wouldn’t be opposed if you decided to top it with cream cheese frosting. Oh how I love cream cheese frosting!!!! Too bad I didn’t have any on hand=(

This is Lilly.


I think she ate half the tray!


Sneaky girl!

Sunday, October 18, 2009

Potatoes...yummm

Oh potatoes how I love thee. Let me count the ways! Fried, baked, mashed, smashed.... However it's prepared, I will eat them. I just bought a huge ass bag of potatoes so I'm trying to think of creative and delicious ways to cook them. Any ideas? The other day I made Garlicky Oven Fries=)
Potatoes and Garlic. Together - they are magically delicious. Drizzled with olive oil and baked in the oven? Crispy and scrumptious strips of awesomeness! I used 6 potatoes and 8 cloves of garlic for this recipe (yes I reallllly love garlic). It can probably feed 5 people as a snack. But me and my two roommates devoured these in 5 minutes and we still wanted more!
I got the recipe from The Purple Foodie. She uses cornstarch, which I never would have thought of! It makes the fries more crunchy=) So if you have a craving for something crunchy on the outside but soft on the inside and delicious all over, try this recipe out!

Garlicky Oven Fries (from The Purple Foodie)
8 garlic cloves, minced
6 tbsp extra virgin olive oil
5 Medium sized potatoes - (I used Idaho but whatever you have is fine)
3 tbsp cornstarch
1 1/2 tsp coarse sea salt
1 1/2 tsp freshly ground black pepper
½ tsp garlic powder
1/4 tsp cayenne pepper

Preheat oven to 475° F.
Combine the garlic and oil in a large bowl, warming it in the microwave until the garlic is fragrant, about 1 minute.
Transfer 5 tablespoons of the oil (leaving the garlic in the bowl) to the baking dish, coating it well.
Add the potatoes to the bowl with the garlic mixture and toss to coat. Wrap tightly in plastic wrap and microwave on high power until the potatoes are translucent around the edges, 3 to 6 minutes, shaking the bowl to redistribute the potatoes halfway through cooking.
Combine the cornstarch, salt, pepper, garlic powder, and cayenne in a small bowl. Sprinkle over the hot potatoes and toss well to coat.
Arrange the potatoes in a single layer on the prepared baking sheet and bake, turning once, until deep golden brown and crisp, 30 to 40 minutes.

I love eating my fries with plain old ketchup, but if you want to get upscale try what I did. I mixed mayo with a bit of lemon zest, lemon juice salt and pepper. The citrusy notes go well with the slightly spicy fries.

Enjoy!!!

Name Change!

Just to update you guys in case you haven't noticed, I changed my blog's name. I thought Baking and Beauty was a bit too tame. So now, it's officially The Bitchin' Kitchen!

Friday, October 16, 2009

Lemon Crisps(??)


So the other day, me and my roommate both had an intense craving for something sweet. We didn’t have chocolate to make chocolate chip cookies or brownies, but we did have all the ingredients for these very simple Lemon Crisps. I saw the picture for the recipe on Tastespotting and I just could not resist. The photo was so cute. The recipe is from Whisk Kid. She calls them Crisps, but I feel like they only stayed crisp for a little while. They were crispy around the edges and soft in the middle. I think they tasted better the next day though because, although they lost the crisp, they got a lot chewier. My roommates devoured them HELLA FAST!
They are topped with a delicious lemon icing, making the cookies twice as lemony! I piped the icing onto the cookies using a Ziploc bag but you can just drizzle for a more free form look! Feel free to add more zest or juice if you like your cookies extra tart, I know I do! The sweetness of the icing balances it out=)

For the cookies (courtesy of Whisk Kid)


1 stick unsalted butter, room temp
¾ c sugar
1 egg, room temp
1 ½ Tbsp lemon juice (I just used the juice of half a lemon)
1 ½ Tbsp lemon zest (I used the zest from the whole lemon)
½ tsp vanilla
½ tsp baking powder
¼ tsp soda
¼ tsp salt
1 ¼ c flour
Preheat oven to 350F.
Cream together the butter and sugar, then add the egg, juice, zest and vanilla. Sift in the dry ingredients and mix until just combined. Drop by rounded tbsps onto lined baking sheets and bake 10-12 min until lightly golden around edges. Let cool on sheets one minute before placing on racks to cool completely. Makes about 2 dozen.

Lemon Icing

1 c icing sugar
4-6 Tbsp lemon juice
Just beat together and drizzle over cooled cookies!

Enjoy!!

Wednesday, October 7, 2009

Broke in the City -_-

It really sucks being broke in New York City. *tear* I returned at the beginning of September for my Sophomore year and things have been pretty (culinarily) depressing.
The first couple of weeks were ok, but then I ran out of money! *tear* So i ate eggs and kimchi for a long ass time. Like, seriously, it was a fried egg and some kimchi almost everyday. I switched it up some days though and experimented with kimchi soups, kimchi/egg sandwiches, and kimchi fried noodles/rice. But for a couple of weeks, it was just that combination.
Then I went back to California for my brother's wedding! I was so happy and I ate so much food! I honestly don't know how I managed to cram in pho,my daddy's chicken congee(chao ga), seafood noodles (hu tieu) and vietnamese sandwiches (banh mi) along with morning wedding food and two wedding dinners all in the span of 3 days. I seriously did not stop eating. And I was so happy! Not just for the food, but to see my family. I feel like I'm more homesick this year than I was last year. I really missed my daddy and I honestly did not want to leave him again. At that moment, flying back to NY meant being broke, deprived and overall just a little bit sad.

Now that I'm back, I stopped eating kimchi! But that doesn't mean I'm any better off. I flew back with a 70lb suitcase full of food. And since then, I've been mainly living off of it. Have you ever had cha lua? It's a vietnamese steamed pork sausage and it's so good. I love it! SO much that I bought back 8 rolls of it! =) I've managed to eat 2 within the past week but I need to pace myself so I can make it last till christmas. I have 6 rolls sitting in my freezer right now.

So this time around, my diet consists of cha, eggs, noodles and cereal. Yep, one can manage to live off of $12 a week haha. There have been some surprising culinary moments though! For example, the other night, I made these surprisingly good soup noodles that tasted almost like home. It was inspired by a dish my dad makes called bun thang and is basically noodles in broth topped with egg, pork sausage and chicken and flavored with fish sauce. I did not have chicken and I did not want to defrost the sausage in my freezer so I made do with eggs and tofu. It's very affordable to make and quite delicious! If you are vietnamese like me, this could seriously bring back intense feelings of homesickness. The ingredients, as always, are approximate and are really based on your preferences.

Ridiculously Cheap Homesickness Inducing Bun Thang

Ingredients
2 Servings of a noodle of your choice.
Traditionally, vermicelli rice noodles are used, but if you only have instant ramen noodles, go ahead!

For the soup:
1 tsp ginger, minced
2 cloves of garlic, minced
1/2 of a small onion, sliced
2-3 Cups Chicken broth (mine was homemade but any will do)

For the topping
1 egg (made into an omelet)
1 Block of firm tofu, cut into thin strips
Fish sauce
Sliced Green onions, chopped cilantro, and fried shallots if you have any!
Lime, chili, and additional fish sauce if needed

For the noodles
- Boil the noodle of your choice in a pot of water according to the package instructions and rinse and drain.

To make the soup base
- pour a bit of oil in a small soup pot and fry the garlic and ginger and onion till fragrant and slightly browned.
-Pour in the broth and season to taste with fish sauce and pepper.

For the topping
- Crack an egg into a bowl and season with pepper, fish sauce, and a little bit of milk(for fluffiness).
- Fry into an omelet in a pan and when cooled, cut into strips.
- Oil a pan liberally and when hot, throw in the strips of tofu. As they begin to crisp up, toss in some fish sauce (about a small spoonful) and fry till it is golden brown and crispy.
- Allow to drain on a paper towel.

To assemble
Place a serving of noodles into a soup bowl.
- Pour broth in and top with the egg and tofu.
- Garnish with the green onions and cilantro
- Season with chili and a squeeze of lime, if desired


Enjoy!

Friday, August 7, 2009

Proudest Culinary Moment?

What culinary achievement has made you the most proud? Was it dinner guests singing your praises as you carried your beautiful Thanksgiving turkey to the table? Or was it when you finally baked the most perfect chocolate chip cookies in the world? You know the kind, crispy around the edges and soft and chewy in the center, oozing with warm melted chocolate.
My proudest moment was when my dad told me my fish sauce tasted just like his. Yep that's right - fish sauce. It defined my culinary achievement.

My dad makes the best fish sauce in the world. Every Vietnamese family has their own way of making it, but from all the ones I've tasted, none can compare. Talking about it now makes my mouth water. It's the perfect combination of spicy, sweet, sour, and salty and I've been eating it all my life. I remember at family parties, my aunt or sister-in-law would try making the sauce. But i could never eat it, or at least never enjoy it, and I'd always have to ask my dad to make me some of his so I could get through the meal.
As a snotty little kid, I refused to eat anyone else's fish sauce. All the other sauces were too sweet or not lemony enough. And I would actually tell them to their face that it "wasn't as good as daddy's". Looking back, I know I was being incredibly rude. But hey! Kids can be honest and get away with it!
One day a few years back, I was helping my dad cook for another family party. I was washing salad when my dad said to me" "Pho (my nickname) make the nuoc mam(fish sauce)." I looked at him and I said "Me? I don't know how to do it! I only like it when you make it!"
"I'll show you how to make it. It's easy." He replied. Easy? The sauce that elevated every dish onto a higher plane?
And he showed me. And it was actually pretty easy.
My brothers couldn't taste the difference. They said it was just like my dad's=) And since then, I've been making the sauce for the parties=)
I might share the recipe sometime, but not right now. Its sort of a family secret=)

Saturday, August 1, 2009

To Buy or Not to Buy? Benefit's "That Gal" Face Primer

So I'm looking at my makeup collection and I'm wondering, how did I accumulate so much stuff? I just buy and buy and most of the stuff I have I don't even use! I mean, on days when I try - i manage to put a lot of stuff on my face. But on a regular day, I just need eyeliner and chapstick. So I'm starting a series of posts entitled To Buy or Not to Buy in order to help evaluate my newest craving. I hope that by blogging about something, I'll be able to determine if I really need/want it or if Its just a temporary lust.
The first object of my desire is Benefit's That Gal Brightening Face Primer.

I'm always looking for face products that give me that healthy youthful glow that seems to come from within, and this product seems to promise just that! The product's description claims to "Prime your skin to pretty - go from dull to darling with "That Gal"! It's a "silky pink primer that makes skin appear smoother and brighter"
Reading the description made me want to buy it already! The problem is, its $24 and I'm a little broke right now. *Sighs* I reaalllly want it though, despite the fact that I already own 3 perfectly good primers. I did some research on it to see what other people thought. The comments on Sephora's website were generally positive. People claimed it made their complexion even out and brighten. But others said that it did nothing whatsoever. I think I'm gonna have to go and try it out myself! I'll blog again to tell you what I think!

A New Beginning?

I think I want to change the direction that this blog is going. I'm still going to blog about food and makeup, but I think I'm gonna include my own bits of randomness every now and again, just to keep things interesting=)

Monday, July 20, 2009

Plum Iced Tea!

Anyone who knows me has heard me talk about my bitchy sister-in-law at least once! Me and her really do not get a long and I honestly think my brother would be much better off without her. With that said, I do appreciate all the fruit she gives us from the trees growing in their backyard. It's plum season and she just dropped off two huge ass bags of plums! What the heck am I supposed to do with all of them, I wondered. The answer I came up with: Plum juice, mixed with Iced Tea. It's a perfect summer drink that's cool, refreshing and not too sweet. It also looks really pretty in the glass too! This recipe can work for almost any juicy fruit that you need to get rid of! I predict 3 big bags of apricots coming my way soon....


Recipe for Plum Iced Tea:
- Juicy Plums
- Lipton Iced Tea
- Simple Syrup

I first made the syrup by mixing in equal parts of water and sugar over medium heat until the sugar dissolved. Do this first so that the syrup will have time to cool.

Next, remove the pit from the plums and place them in a blender. You can either cut the plums and then take the pit out, or just squeeze them until it comes out(this way is much much faster).
Blend up the plums with a little water to loosen it up and strain through a sieve to get rid of the skin.
Brew your ice tea (I used Lipton Cold Brew because I didn't want to wait for it to cool)
Mix everything together along with your syrup until the sweetness is to your liking. Garnish with a mint leaf and enjoy=)

Thursday, April 16, 2009

Simple Egg Salad


As I write this blog post, the time on my clock is 5:57 a.m. I have the worst sleeping schedule and therefore miss my morning classes quite often. When i stay up late, I get these intense food cravings that I must satisfy...or else! On this particular night, I had a craving for the creamy goodness of egg salad! A little bit odd yes...but you can't control what you crave!!! Scrounging through my fridge, I could only find the basics needed for the salad - eggs, mayo and horseradish mustard (our fridge is empty most of the time). We didn't have any veggies to put in the salad like celery or peas, so I made do with some cilantro I needed to use up. The end product was surprisingly delicious and really satisfied my craving. This recipe is really easy and you only need a few ingredients! Scoop some of this on a slice of bread and you're set for a delicious egg salad sandwich=)

Ingredients
(Enough for 1 person!)
3 Eggs
1-2 Tbsp low fat mayo
1-2 Tbsp Mustard (I used horseradish mustard because a) it was the only kind I had and b) i like the spicy flavor it imparts on the salad)
A few sprigs of cilantro
Salt & Pepper

Directions
Place the eggs in a pot of cold water and bring to a boil, covered. When the water starts bubbling, turn off the heat, leave the pot covered, and let the eggs sit for 10-12 minutes in the water.
In the meantime, chop up the cilantro or whatever veggies you have in your fridge and place in a small mixing bowl.
When the eggs are done, run them under cold water to cool them and peel & chop.
Place the eggs in the bowl along with the cilantro, add mayo, mustard and salt & pepper till you get the consistency and taste that you like! I like mine extra hot so I put in a lot of mustard!
You can eat it warm, like I did because I couldn't wait, or chill it in the fridge for later!

Craving satisfied!

--- Thuy=)